
Han Solo, the other Captain Tightpants.
More in my series of posts about making a Han Solo costume. This time… the Han Solo Costume Pants with included bloodstripe embroidery file!
More on Making Han Solo’s Costume:
Making Han Solo’s Vest
The Han Solo costume pants are a bit tight and have no pockets. They’re made out of denim. There is a waistband with belt loops. There is a riding seam on the back of the pants and a pintuck down the front. Magnoli offers them, but I was confident I could make them myself and save some money. I wanted to make the pants before I made the vest, so that I could make sure the vest was the right length compared to the Han Solo costume pants.
MAKING THE MUSLIN FOR HAN SOLO COSTUME PANTS
After trying a jeans pattern to make a muslin and it not fitting my husband even remotely, I went back to my old trusty standby for him, a pair of khaki slacks I ripped up. Basically, when one of my husband’s well-fitting pairs of khaki slacks started to wear out, I asked if I could have them and I carefully seam ripped them apart so that I could use them as a pattern. I use this as the base pattern for almost all his costume pants. I just take them in if the pants need to be tighter and so on.
Han Solo costume pants should be a bit tight fitting, but not so tight that you can’t sit down or cross your legs wearing them without them looking stressed or too-tight. So when you’re doing your fittings, try to move around in the pants and test them before you finalize the muslin. Make sure you don’t make it too small! Your costume might “shrink up” a bit by accident, too as you finalize it. And you can always take one of the side seams in a little bit more in your final “real fabric” fitting.
Once I made the muslin from this pattern, I took the pants muslin in at the outer side seam and I took a marker and drew the riding seam on the seat and down the leg. You can see what the riding seam looks like on this Rebel Legion thread. Basically it’s a round seam around the seat of the pants going down the center back of each leg. I also drew the center front of the legs to show about where I needed the front pintuck to be. To do the riding seam, I split the pants pattern piece which contained the riding seam and then did a new muslin for those (now two ) pieces adding seam allowance.

FABRIC
According to the book “Dressing A Galaxy”, brushed denim was used to make the Han Solo costume pants. Also if you look at higher resolution promotional pics you can clearly see the denim look. I decided to go with my closest match at JoAnn’s Fabric when I had a coupon. I went with a dark denim with a lighter brushed detailing and a slight stretch.
BLOODSTRIPES
Han Solo has embroidered small red stripes down the outer side seam of each leg. For Han Solo costume pants embroidery, you can get the bloodstripe for Han’s pants at www.costumecostumecostume.com on their Patches page (about midway down). But as I wanted to make my own pants and I wasn’t sure if their patch would perfectly match the pants fabric I was going to choose, I decided to make the bloodstripes myself. I also have an embroidery machine (Viking Designer 1) which made it a lot easier.
My friend AJ made the bloodstripe embroidery file for me. After a couple tries to get the exact width and repeat we got it right! According to Rebel Legion the bloodstripes are about 1 inch wide by 1/4 inch high, with only 1/8 of an inch of space between each embroidered section.
- If you have a machine which can use HUS format, here is the embroidery file AJ made for me. You can use it for personal use, no for sale use or redistribution.
 Han Solo Bloodstripe Embroidery is licensed under a Creative Commons Attribution-NonCommercial-NoDerivs 3.0 Unported License.
Some tips, if you decide to use an embroidery machine to do your stripes, you might try putting registration stitches on your file so it’s easier to line up your hoop. You can also try doing a tailor’s chalk line down your fabric to help you line up the hoops as you go. I also made sure that I cut out all the other pants parts first before cutting out the remnants for the bloodstripes. I tried to lay out the pattern pieces as economically as I could so I’d be sure to have enough left for the stripes. Even then, though, some parts of the strips I used to embroider the stripes on were a little narrow and hard to put into the hoop. I used stabelizer on the back to help with that as well as just make the embroidery cleaner.

And here’s one of the finished stripes! You can see how large the strip of fabric is for the bloodstripe to make it easier to hoop. It’s not just “the size of the bloodstripe”.

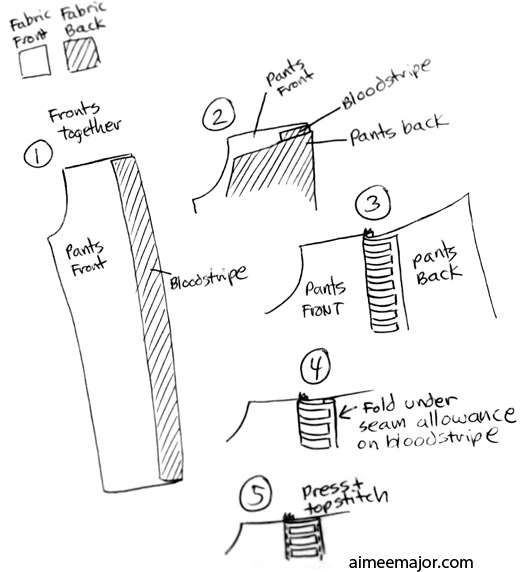
I then cut around the bloodstripes leaving a seam allowance around the stripes. I sandwiched the bloodstripe between the front and back pieces along the side seam. Then I pressed and topstitched the bloodstripe along that side seam and then pressed under the seam allowance on the remaining bloodstripe side. I pinned that down, topstitched it and then pressed it again. Then I stitched the remaining inner side seam of the leg and continued to finish the pants normally.
Here’s some drawings showing how I put together the front and back of the pants with the bloodstripe. Keep in mind that if you wanted to spend the time, you could modify the back pants leg piece so that it is “minus” the size of the bloodstripe to have less bulk, but I wanted the option to, if I really needed to, let out along the outer side seam, so I left that extra fabric on the back leg piece behind the bloodstripe. Hopefully this will make sense in the drawing below.
Here’s me about to topstitch the bloodstripe down…

FINISHING THE HAN SOLO COSTUME PANTS
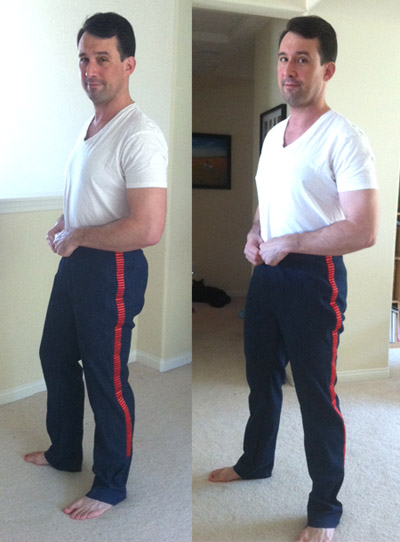
And here’s my husband trying them on before I fully put the zipper in and put the waistband on. I must have had him try on the muslin like 4 times and then the final pair (this) at least twice to make sure they fit right. One of the try on sessions included him trying the pants on with a pair of boots to make sure that the lower leg was taken in enough not to blouse up over the top of the boots too much.
After checking the fit that last time, I put a pintuck down the center front of each pants leg. I had my husband try them on and then I marked where I wanted the pintuck with dressmaker’s chalk. You can read here on Burda about how to do a pintuck or see this youtube video here. Keep in mind, you just have to do one pintuck and it doesn’t need to be very large, maybe 1/8″.
And here’s the completed pants (worn with the shirt) with waistband, lovely belt loops, front pin-tuck and hemmed bottom. That was a lot of work!
A tip for the belt loops. Make sure you have already in hand your black 3-holed 2-prong belt so that you can make sure you make your waistband and beltloops to fit it.

These came out great!
It’s interesting that you went with an actual pant all the way to the knee versus cheating it with a stretch fabric where the boot would cover. You did such an incredible and thorough job!
I have to ask thought. Mitch has a more modern day hairstyle – is he, uhm…, going to grow out or wear a wig to match that luscious 70s coif Harrison Ford is rocking?
Oh wow! Those came out fantastic! Where did you get the shirt from? I am trying to have one made for Comic Con but as I’m a girl it’s very tricky to find an accurate looking shirt in my size.
Thanks Chandler! I made the shirt, too. You can see more about how I made it here: http://aimeemajor.com/wp/2013/02/19/making-a-han-solo-costume-shirt/ For you being a girl, though, I’d probably just start with a long-sleeve female polo shirt pattern if you can find it.
Excellent post. I was doing some research for a customer looking for a Han Solo costume and found your blog.
I subscribed right away!
Thanks! Goodluck with your costume!